<a id="19f3160bddf280ab831fc72e4ddc46e8"></a><a id="19f3160b-ddf2-80ab-831f-c72e4ddc46e8"></a>

<a id="19f3160bddf280e49005edd4debbffd8"></a><a id="19f3160b-ddf2-80e4-9005-edd4debbffd8"></a>

> <a id="19f3160bddf28070b8f2ce5cc16ad783"></a><a id="19f3160b-ddf2-8070-b8f2-ce5cc16ad783"></a>
> 
> Experimental trial feature.

<a id="19f3160bddf280e8a470cef93e9fcd2e"></a><a id="19f3160b-ddf2-80e8-a470-cef93e9fcd2e"></a>

<a id="19f3160bddf2807d8bd7e6e2912966a7"></a><a id="19f3160b-ddf2-807d-8bd7-e6e2912966a7"></a>

# <a id="tipos-de-importación" data-help-heading="true"></a>IMPORT TYPES

- <a id="19f3160bddf28003ae3cfc44e81df8ed"></a><a id="19f3160b-ddf2-8003-ae3c-fc44e81df8ed"></a>Contacts

<a id="19f3160bddf28013ade5cf858648de83"></a><a id="19f3160b-ddf2-8013-ade5-cf858648de83"></a>

# <a id="modos-create-merge" data-help-heading="true"></a>Modes: create, merge

<a id="19f3160bddf280c9bdc2e50aa0610088"></a><a id="19f3160b-ddf2-80c9-bdc2-e50aa0610088"></a>

## Create

<a id="19f3160bddf2804d909ff753f1e68fd7"></a><a id="19f3160b-ddf2-804d-909f-f753f1e68fd7"></a>

For each row in the file, a contact will be created in your account, even if there are contacts with the same data

<a id="19f3160bddf280b184eddac7489e6c64"></a><a id="19f3160b-ddf2-80b1-84ed-dac7489e6c64"></a>

## Merge

<a id="19f3160bddf280abb650d2ffef1a329c"></a><a id="19f3160b-ddf2-80ab-b650-d2ffef1a329c"></a>

If a contact with the same email already exists in your account, it will be updated with the new data. If it does not exist, a new one will be created. Important: the update made to the contacts cannot be undone. Newly created contacts can be deleted

<a id="19f3160bddf280a49777d868ebb03590"></a><a id="19f3160b-ddf2-80a4-9777-d868ebb03590"></a>

# <a id="campos-válidos" data-help-heading="true"></a>Valid fields

- <a id="19f3160bddf280cc9125db8c1884971e"></a><a id="19f3160b-ddf2-80cc-9125-db8c1884971e"></a><strong>first\_name</strong>: First name or full name. This field or the email field is required to import.
- <a id="19f3160bddf28063b00ec2487a7f0407"></a><a id="19f3160b-ddf2-8063-b00e-c2487a7f0407"></a><strong>email: </strong>Email in valid format. It will be used as an identifier if using the ‘merge’ option. This field or the first\_name field is required to import.
- <a id="19f3160bddf280fb8016ea263f117b42"></a><a id="19f3160b-ddf2-80fb-8016-ea263f117b42"></a><strong>subscription\_status</strong>: Indicates whether the email is active or deactivated. It will only be considered if there is also an email in the imported file. valid values: “subscribed” or “unsubscribed”.
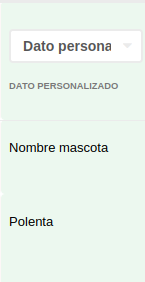
- <a id="19f3160bddf28020baadee9fcafaa9aa"></a><a id="19f3160b-ddf2-8020-baad-ee9fcafaa9aa"></a><strong>Custom data</strong>: If this type of field is chosen, the value in this column will be added as custom data in the contact. The name of the custom data will be the name of the column in the imported file. If a custom data with that name already exists it will be used; otherwise, a new one will be created. 
<a id="19f3160bddf280bf919bfbf1d039f703"></a><a id="19f3160b-ddf2-80bf-919b-fbf1d039f703"></a>

<img src="/help-assets/243b8e2786211b939bb5e8157a1bd0e673bbd9c103076c25804a99fde449fadb.png" alt="En este caso, el dato personalizado se llamará: “Nombre mascota” y el valor para el primer contacto será: “Polenta”">

In this case, the custom data will be called: “Pet name” and the value for the first contact will be: “Polenta”

<a id="19f3160bddf280aa97e0f74c69e3b4aa"></a><a id="19f3160b-ddf2-80aa-97e0-f74c69e3b4aa"></a>

# <a id="nueva-importación" data-help-heading="true"></a>New import

<a id="19f3160bddf280c9b758d80636928da0"></a><a id="19f3160b-ddf2-80c9-b758-d80636928da0"></a>

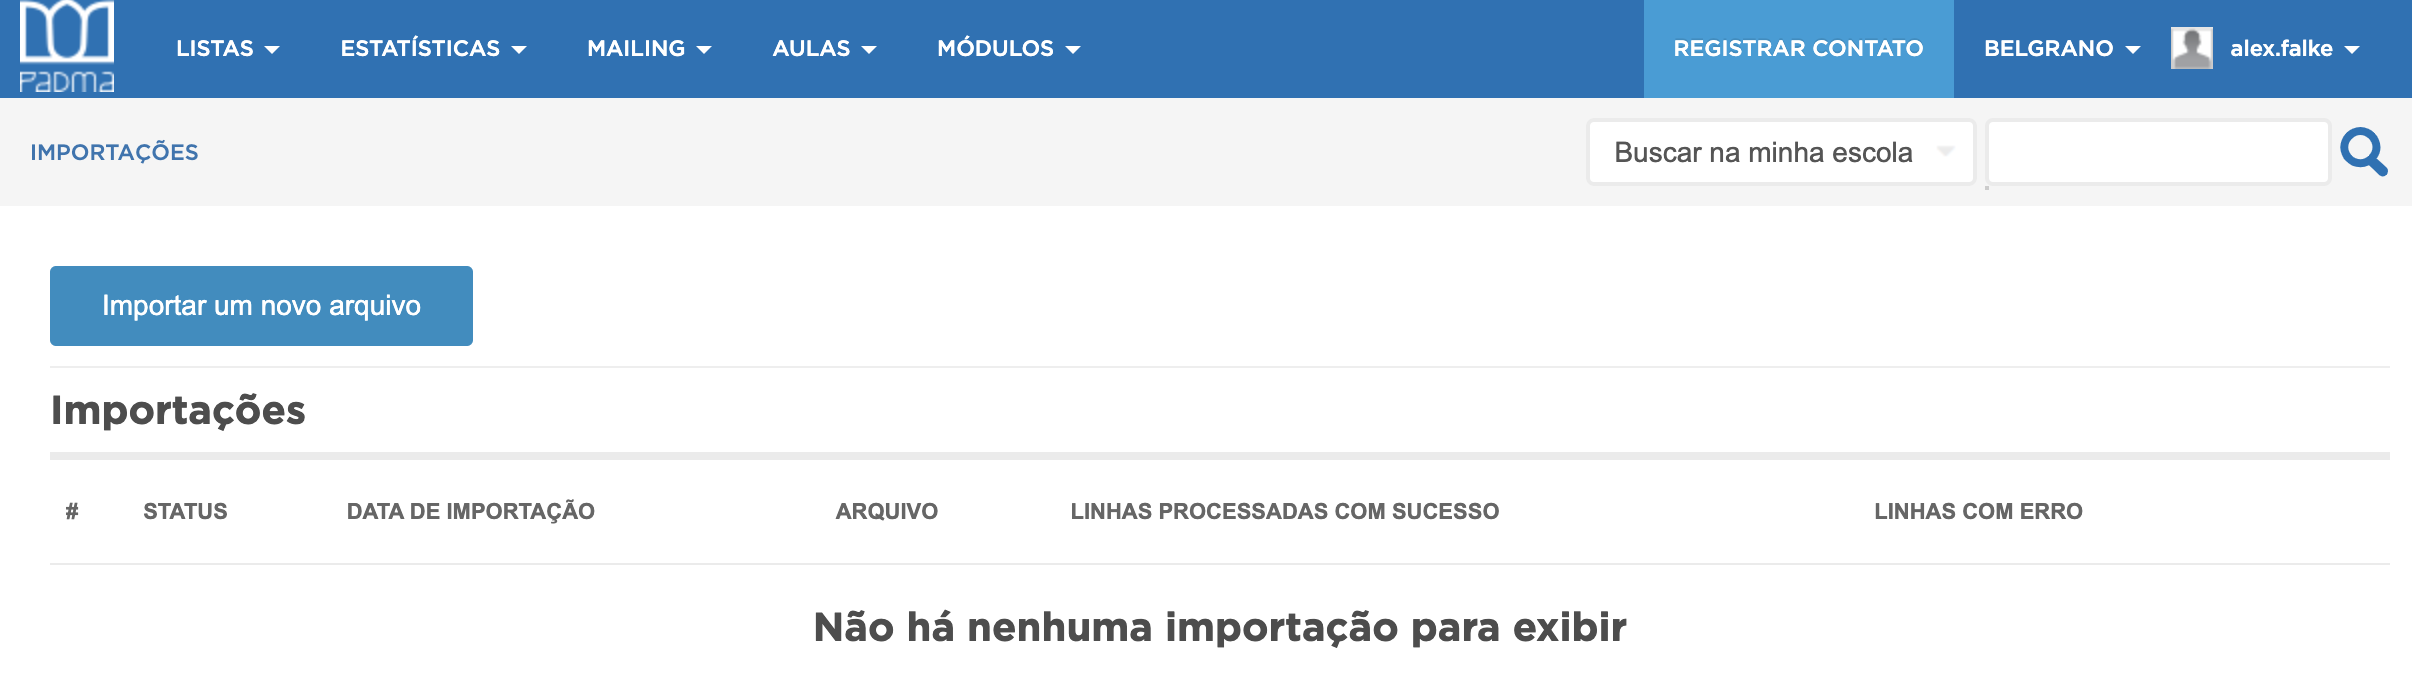
To perform a new import click on the menu at Modules → Imports. You will see the imports done or being processed. On this screen, click “Import new file”.

<a id="19f3160bddf280feb44bf2a3977ede5b"></a><a id="19f3160b-ddf2-80fe-b44b-f2a3977ede5b"></a>

## <a id="cargar-archivo" data-help-heading="true"></a>Upload file

<a id="19f3160bddf28017b00ccce4a797021a"></a><a id="19f3160b-ddf2-8017-b00c-cce4a797021a"></a>

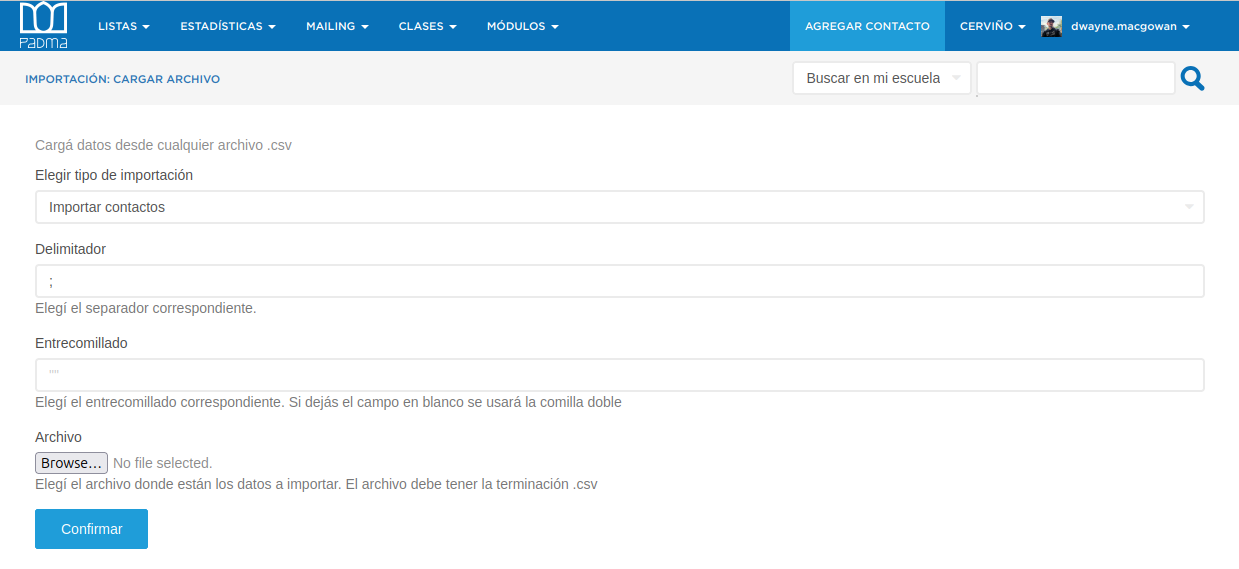
On the next screen, we will have the following fields:
<a id="19f3160bddf28080a5edf042050306ec"></a><a id="19f3160b-ddf2-8080-a5ed-f042050306ec"></a>

<img src="/help-assets/eccaeb06808f89a74246c37bc220e2815a265927a0ff738072a1b634463b32e8.png" alt="Screenshot from 2025-02-19 16-27-37.png">

1. <a id="19f3160bddf280c7964bdd5daeb6178e"></a><a id="19f3160b-ddf2-80c7-964b-dd5daeb6178e"></a>Import type: Currently only contacts can be imported.
1. <a id="19f3160bddf2804aa712f08b0071e365"></a><a id="19f3160b-ddf2-804a-a712-f08b0071e365"></a>Delimiter: Choose the delimiter your file uses (by default the delimiter chosen by your user will be used)
1. <a id="19f3160bddf28001bf50e00f93ad3cb9"></a><a id="19f3160b-ddf2-8001-bf50-e00f93ad3cb9"></a>Quoting: Choose the quoting used to group words in a phrase (by default quotation marks will be used)
1. <a id="19f3160bddf280a181c2da458e17ee33"></a><a id="19f3160b-ddf2-80a1-81c2-da458e17ee33"></a>File: Here you must choose the file to process. Currently, only CSV files are accepted (comma separated values)

<a id="19f3160bddf2802ab0c0db409d12656a"></a><a id="19f3160b-ddf2-802a-b0c0-db409d12656a"></a>

Once everything is correct, you can proceed to the next step by clicking the “Confirm” button

<a id="19f3160bddf280868c6ddc39568bee6d"></a><a id="19f3160b-ddf2-8086-8c6d-dc39568bee6d"></a>

## <a id="revisar-la-configuración" data-help-heading="true"></a>Review configuration

<a id="19f3160bddf2800da23bf06ad82b4344"></a><a id="19f3160b-ddf2-800d-a23b-f06ad82b4344"></a>

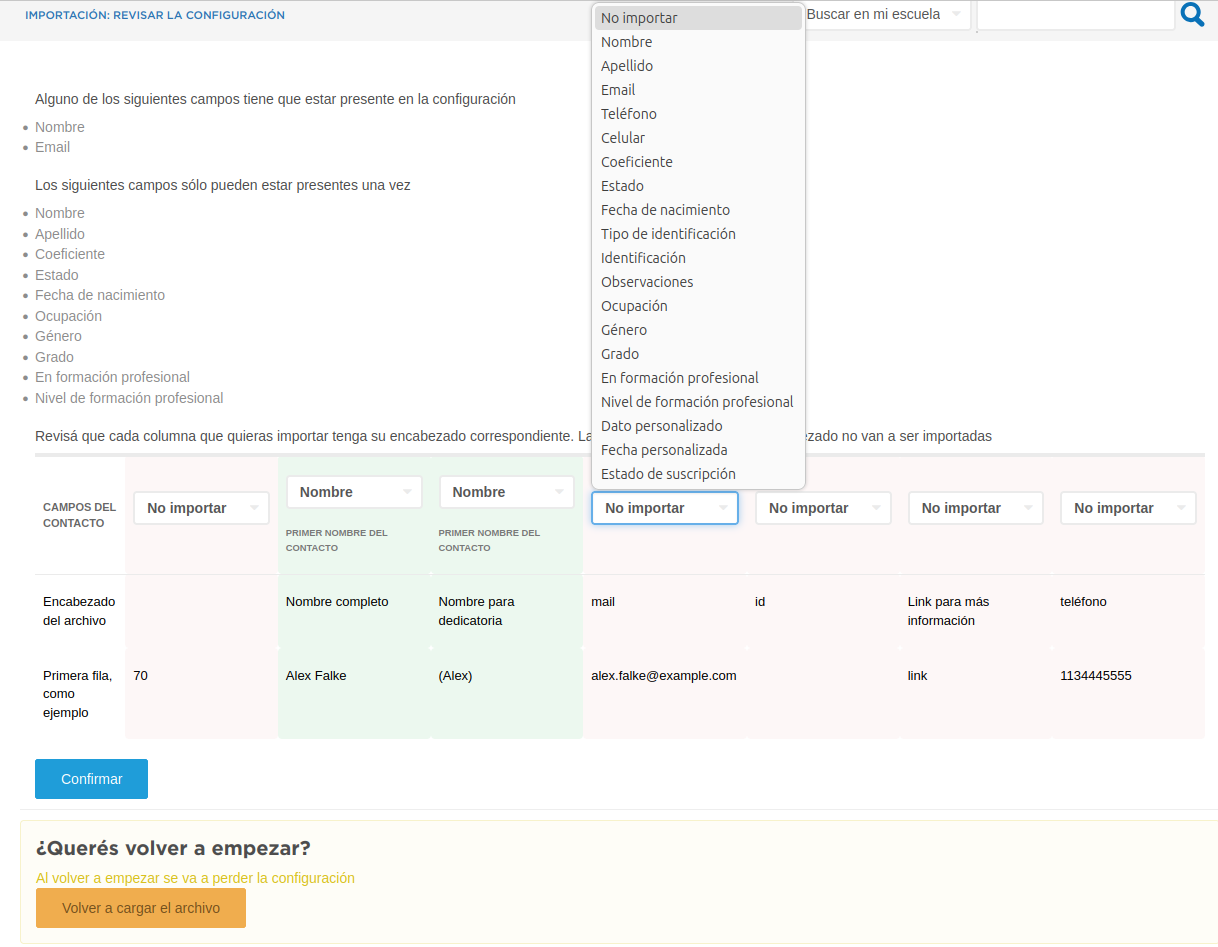
The next screen is to check if the configuration is correct and make necessary adjustments.
<a id="19f3160bddf2807ca79cce4d31be02ef"></a><a id="19f3160b-ddf2-807c-a79c-ce4d31be02ef"></a>

<img src="/help-assets/32963124ef0230c351ab0615184c6811a359a7437a098290ce0dd92851d3dd83.png" alt="Screenshot from 2025-02-19 16-38-07.png">

<a id="19f3160bddf280038e99e0ec9f6e8924"></a><a id="19f3160b-ddf2-8003-8e99-e0ec9f6e8924"></a>

Three rows are shown:

1. <a id="19f3160bddf28078b742f6a9cb5e62e8"></a><a id="19f3160b-ddf2-8078-b742-f6a9cb5e62e8"></a><strong>Contact fields</strong>: This row indicates how we want to import each column. If we prefer to ignore it, or if we want it to be of a specific type. The system tries to automatically identify the type, but we can modify everything. In the image example, for instance, we can modify the fourth column to choose “email” as the field and thus import the values in that column as the contact's email. If custom data is chosen, a custom data item will be created with the header name as name and row value as value. In this case, for example, if we choose the sixth column as custom data, the contact will have custom data called “link for more information” with the value “link”
1. <a id="19f3160bddf280f082afe183d4607777"></a><a id="19f3160b-ddf2-80f0-82af-e183d4607777"></a><strong>File header</strong>: The original file header is shown to select the correct field type
1. <a id="19f3160bddf28061ad96ce29ed236092"></a><a id="19f3160b-ddf2-8061-ad96-ce29ed236092"></a><strong>First row, as example</strong>: The values of the first row are shown to provide more information about each column

<a id="19f3160bddf280499bb3dcf835e087b2"></a><a id="19f3160b-ddf2-8049-9bb3-dcf835e087b2"></a>

If everything is correct, we can proceed to the next phase by pressing the “Confirm” button.

<a id="19f3160bddf280cb90c3de40c387848d"></a><a id="19f3160b-ddf2-80cb-90c3-de40c387848d"></a>

If something was wrong, we can start over from scratch by pressing the “Reload file” button

<a id="19f3160bddf280b48500cc222cca5773"></a><a id="19f3160b-ddf2-80b4-8500-cc222cca5773"></a>

## <a id="importar" data-help-heading="true"></a>Import

<a id="19f3160bddf28090b670f257183f9c02"></a><a id="19f3160b-ddf2-8090-b670-f257183f9c02"></a>

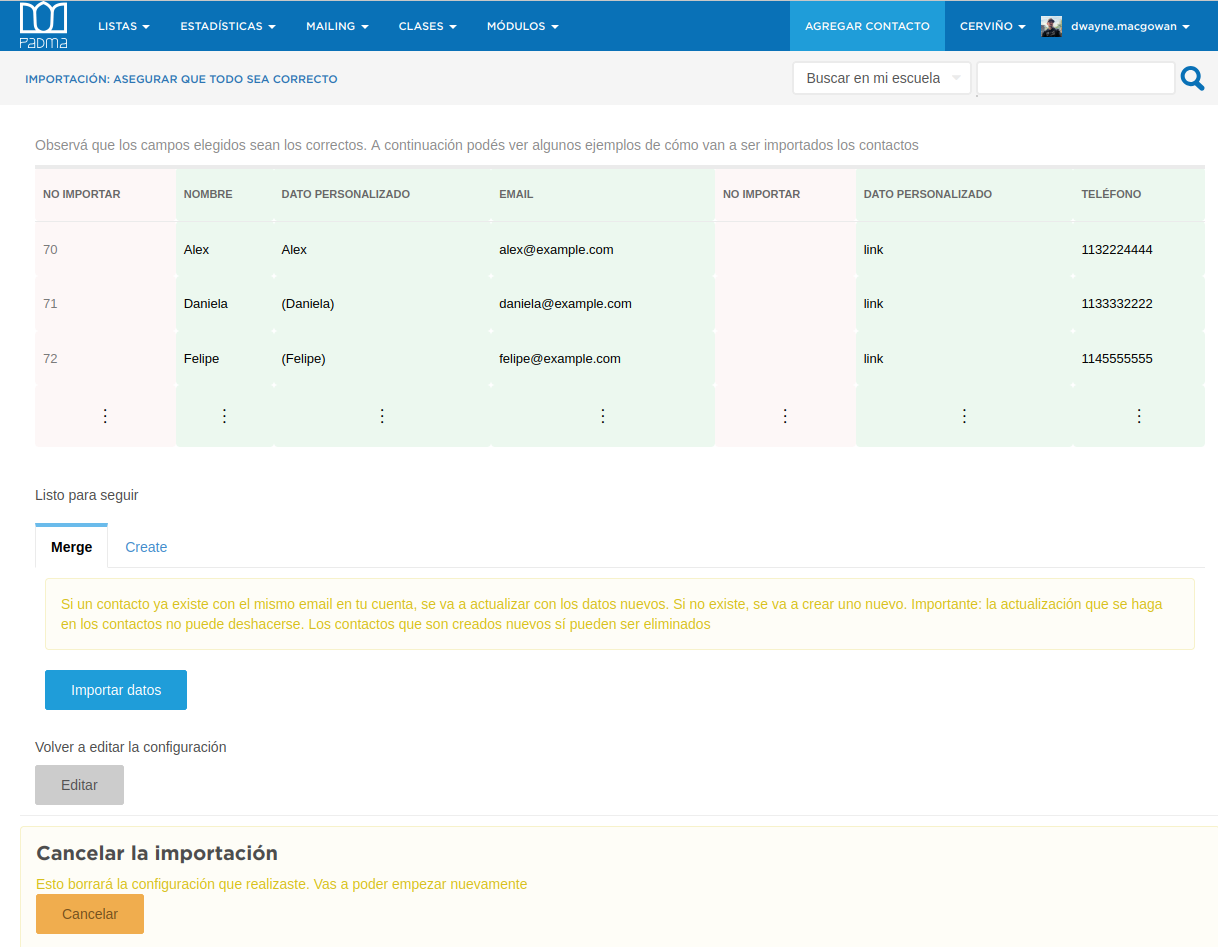
Finally, we have a last screen where we see the first three rows as examples, to see how the data will be imported
<a id="19f3160bddf2803d9dcefa5104a01dc1"></a><a id="19f3160b-ddf2-803d-9dce-fa5104a01dc1"></a>

<img src="/help-assets/9daf30a8cfa267bf5600f07fce3b25222e4ce12e62eb8c338825a6130c4eaaa1.png" alt="Screenshot from 2025-02-19 16-49-39.png">

<a id="19f3160bddf28038aaf7dfddf9e04350"></a><a id="19f3160b-ddf2-8038-aaf7-dfddf9e04350"></a>

Columns highlighted in green will be imported and their import method specified. The others will be ignored.

<a id="19f3160bddf28003bd04c625fc06522f"></a><a id="19f3160b-ddf2-8003-bd04-c625fc06522f"></a>

You can import in two ways:

1. <a id="19f3160bddf280768f90d40bdd67ba1b"></a><a id="19f3160b-ddf2-8076-8f90-d40bdd67ba1b"></a>Merge: If a contact with the same email already exists in your account, it will be updated with the new data. If it does not exist, a new one will be created. Important: the update made to the contacts cannot be undone. Newly created contacts can be deleted
1. <a id="19f3160bddf280ca92ccd82abcd5732f"></a><a id="19f3160b-ddf2-80ca-92cc-d82abcd5732f"></a>Create: For each row in the file, a contact will be created in your account, even if there are contacts with the same data

<a id="19f3160bddf28097ad9cf621c20a7bea"></a><a id="19f3160b-ddf2-8097-ad9c-f621c20a7bea"></a>

If everything is correct we can start importing the data by clicking “Import data”.

<a id="19f3160bddf280858678e657139f72a8"></a><a id="19f3160b-ddf2-8085-8678-e657139f72a8"></a>

If there was any error in the configuration you want to fix, you can click “Edit”.

<a id="19f3160bddf280ac9552c5f5ff16d2da"></a><a id="19f3160b-ddf2-80ac-9552-c5f5ff16d2da"></a>

If you prefer to cancel everything, clicking “Cancel” deletes everything done so far.

<a id="1ab3160bddf28012838ddc017ed3c505"></a><a id="1ab3160b-ddf2-8012-838d-dc017ed3c505"></a>

# <a id="importar-suscriptosdesuscriptos" data-help-heading="true"></a>Import subscribers/unsubscribers

<a id="1ab3160bddf2802ba592df28950b900b"></a><a id="1ab3160b-ddf2-802b-a592-df28950b900b"></a>

We can import the subscription status of a contact from a list. For example, if I want to import the unsubscribed list from Mailchimp or Brevo, I can export the corresponding list from that page and import it into Padma as follows:

<a id="1ab3160bddf280cf86e4c53dd01f8939"></a><a id="1ab3160b-ddf2-80cf-86e4-c53dd01f8939"></a>

## <a id="1-modificar-el-archivo-a-importar" data-help-heading="true"></a>1\. Modify the file to be imported

<a id="1ab3160bddf280d98b34da2d85004564"></a><a id="1ab3160b-ddf2-80d9-8b34-da2d85004564"></a>

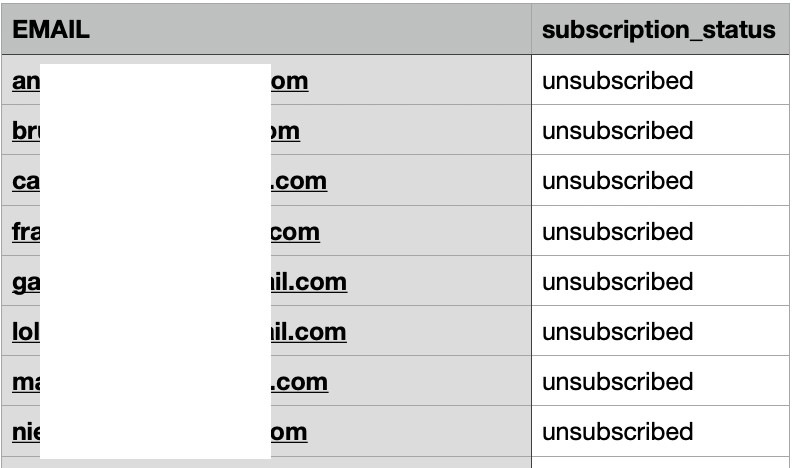
Add a subscription status column. The name can be anything, but the system will automatically identify this column if its name is: subscription\_status. The cell value can be one of two: <strong>subscribed</strong> or <strong>unsubscribed</strong>. Any other value will be ignored. Contacts whose email is paired with unsubscribed will be marked unsubscribed in Padma. If the value is subscribed, that email will be subscribed, even if previously unsubscribed.
<a id="1ab3160bddf2807e80c1fd738d845b4d"></a><a id="1ab3160b-ddf2-807e-80c1-fd738d845b4d"></a>

<img src="/help-assets/31c7a0f20f3767b72a7c725a392adb760146000edc154d6cb27e219785e57df0.png" alt="imp_subs_0.png">

<a id="1ab3160bddf280a987f5ca6f3d4c6628"></a><a id="1ab3160b-ddf2-80a9-87f5-ca6f3d4c6628"></a>

## <a id="2-ir-a-la-parte-de-importaciones-de-padma" data-help-heading="true"></a>2\. Go to Padma's import section

<a id="1ab3160bddf2808c89e3dd5141c8589c"></a><a id="1ab3160b-ddf2-808c-89e3-dd5141c8589c"></a>

<img src="/help-assets/acf02ac60c5e1a53b30a68001b69839d36d35702cad337dbade10f1ce8f3e845.png" alt="Screenshot 2025-03-03 at 12.04.09.png">

<a id="1ab3160bddf280e4ad98f977c84ecca6"></a><a id="1ab3160b-ddf2-80e4-ad98-f977c84ecca6"></a>

## <a id="3-seleccionar-el-archivo-y-elegir-las-columnas-correspondientes" data-help-heading="true"></a>3\. Select the file and choose the corresponding columns

<a id="1ab3160bddf2801885a1e038066cab32"></a><a id="1ab3160b-ddf2-8018-85a1-e038066cab32"></a>

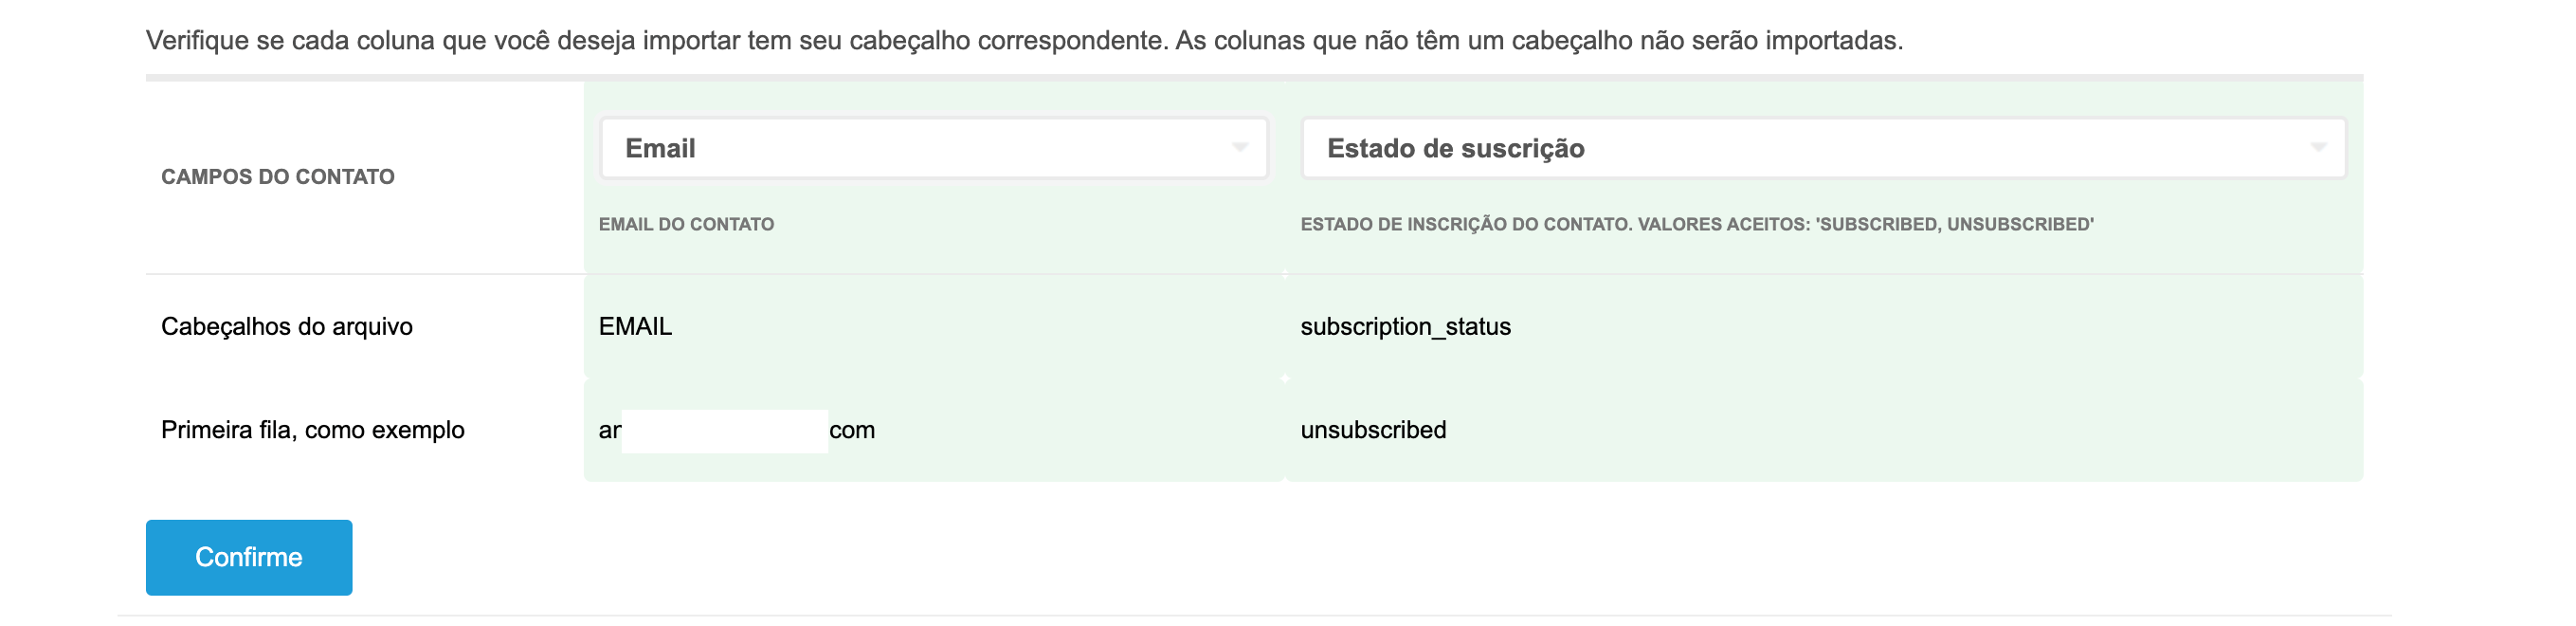
Once the file is selected as per previous instructions, it is important to select the corresponding columns. In this case, we will select the column e-mail with value e-mail and the subscription status column we added in our list:
<a id="1ab3160bddf28095aa99ef9609ea2c97"></a><a id="1ab3160b-ddf2-8095-aa99-ef9609ea2c97"></a>

<img src="/help-assets/7660de85ca43e1b0e9eea69cfe66a1792480c544187e9b5323c26c2becc80661.png" alt="imp_subs_2.png">

<a id="1ab3160bddf280b7bc12d48706fdb233"></a><a id="1ab3160b-ddf2-80b7-bc12-d48706fdb233"></a>

## <a id="4-verificar-si-está-todo-bien-antes-de-importar" data-help-heading="true"></a>4\. Verify everything is correct before importing

<a id="1ab3160bddf280149368ee77b11afb0a"></a><a id="1ab3160b-ddf2-8014-9368-ee77b11afb0a"></a>

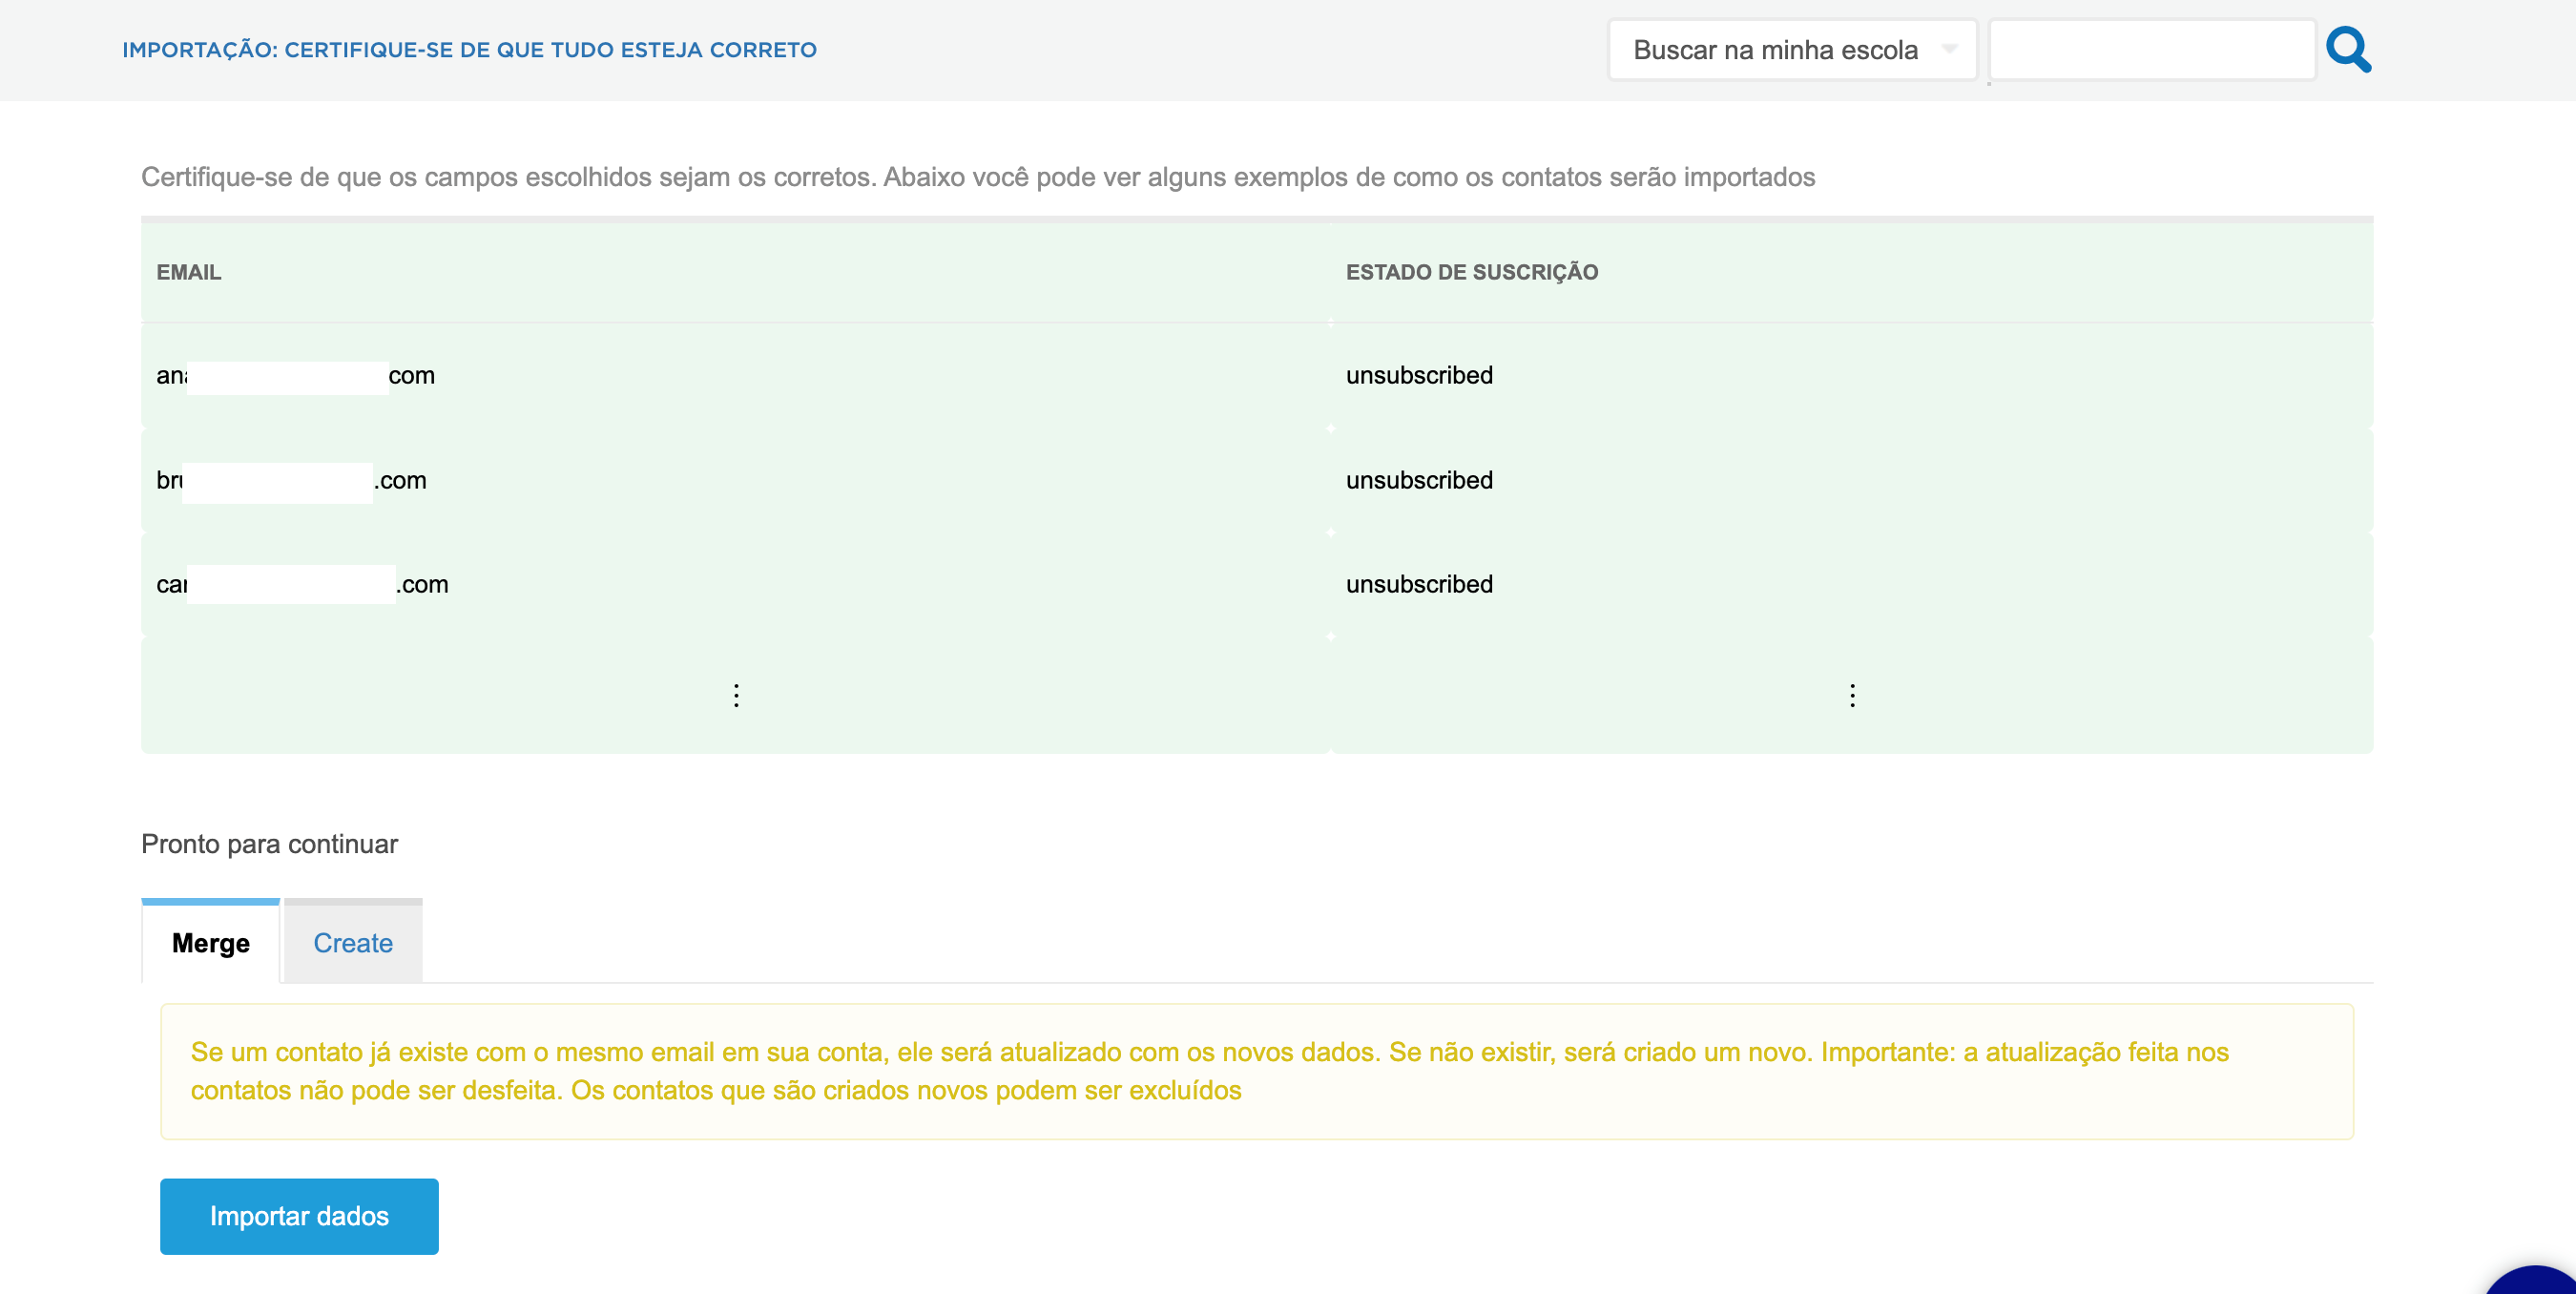
We can see some examples of how this information will be imported. It is important here to choose the merge option, so it will not create new contacts but modify existing ones (If a contact does not exist with the data provided, it will be created).
<a id="1ab3160bddf2805391a7fb866e8e4787"></a><a id="1ab3160b-ddf2-8053-91a7-fb866e8e4787"></a>

<img src="/help-assets/49b7f8363bfb0d708670dd43c4047e89a7607eb968e1ec533cde5a5e7c865d0e.png" alt="imp_subs_1.png">

<a id="1ab3160bddf28083a527cfecfa52b31c"></a><a id="1ab3160b-ddf2-8083-a527-cfecfa52b31c"></a>

## <a id="5-dejar-que-termine-la-importación" data-help-heading="true"></a>5\. Let the import finish

<a id="1ab3160bddf280b6b6d8cdcfe686041e"></a><a id="1ab3160b-ddf2-80b6-b6d8-cdcfe686041e"></a>

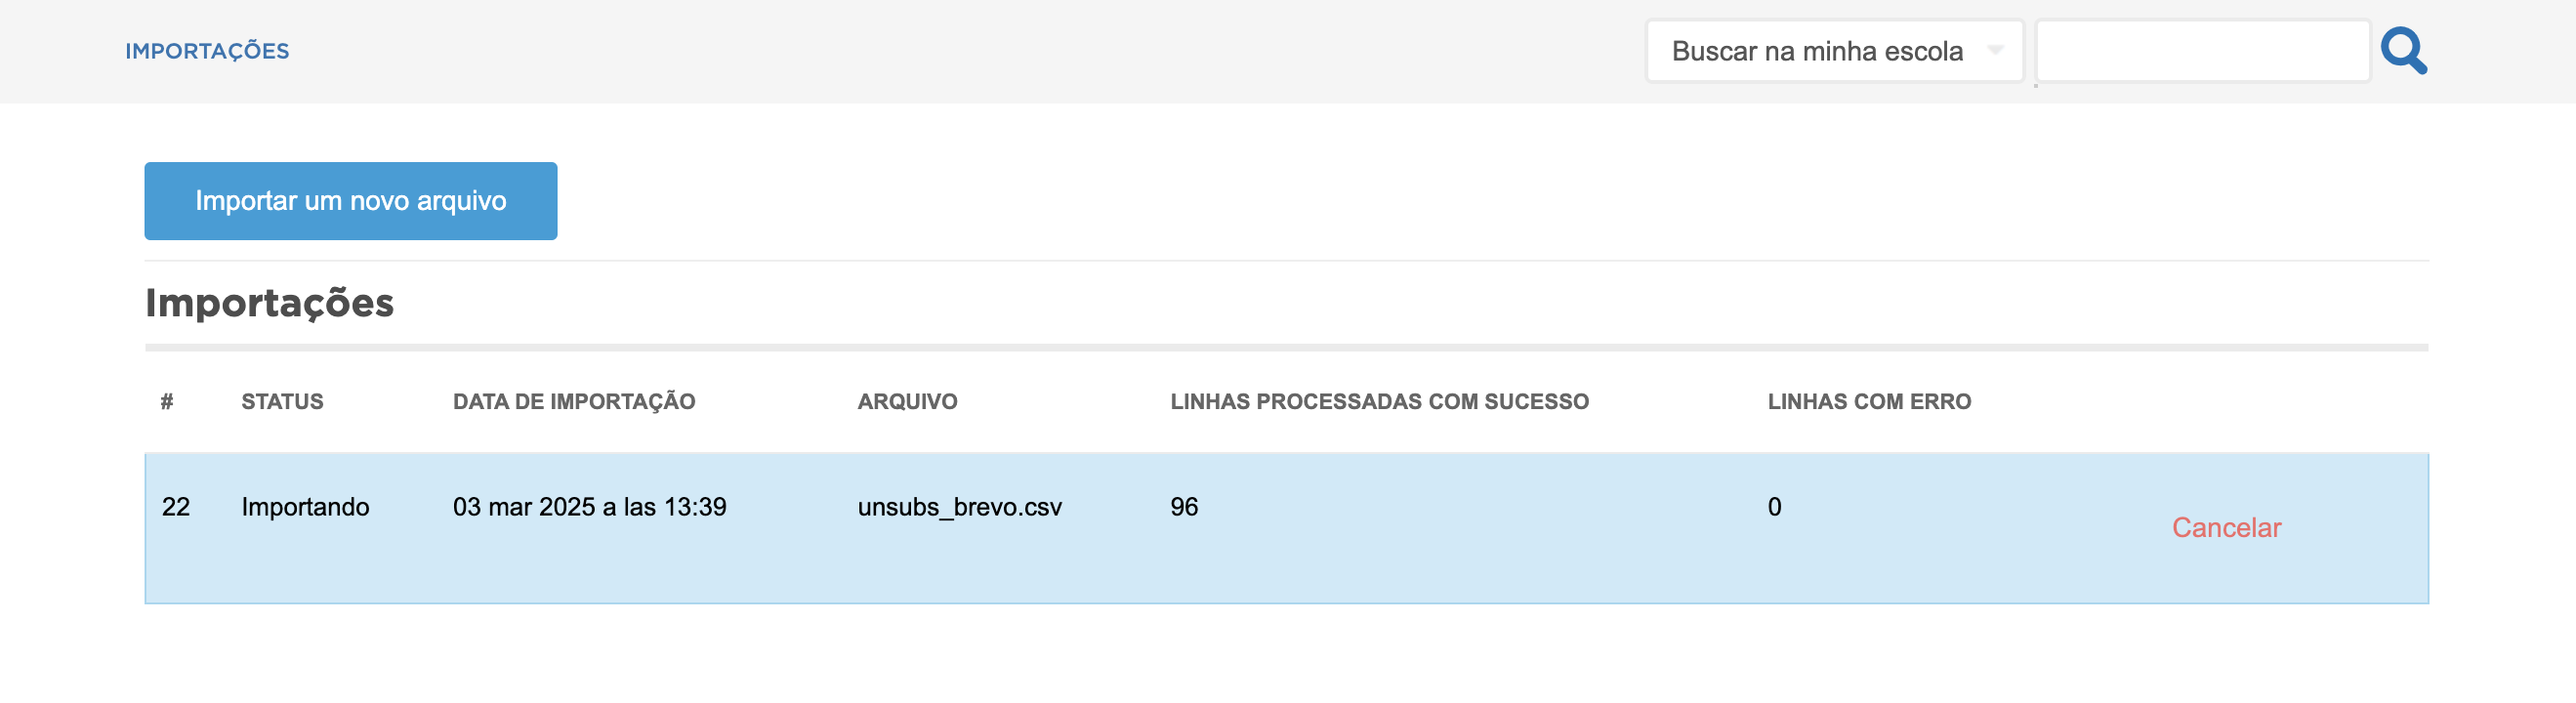
The system will import the contacts and you can refresh occasionally to see the status:
<a id="1ab3160bddf28035accde8ebfccdccd4"></a><a id="1ab3160b-ddf2-8035-accd-e8ebfccdccd4"></a>

<img src="/help-assets/a36940cf689b36f76a0a8a634c6672843ef4a940062f05f9c74466192a45983d.png" alt="Screenshot 2025-03-03 at 13.50.32.png">

<a id="1ab3160bddf280379f06c3eb76839686"></a><a id="1ab3160b-ddf2-8037-9f06-c3eb76839686"></a>

## <a id="6-finalizar-y-revisar" data-help-heading="true"></a>6\. Finish and review

<a id="1ab3160bddf280eca10fc5dd22ed5d8b"></a><a id="1ab3160b-ddf2-80ec-a10f-c5dd22ed5d8b"></a>

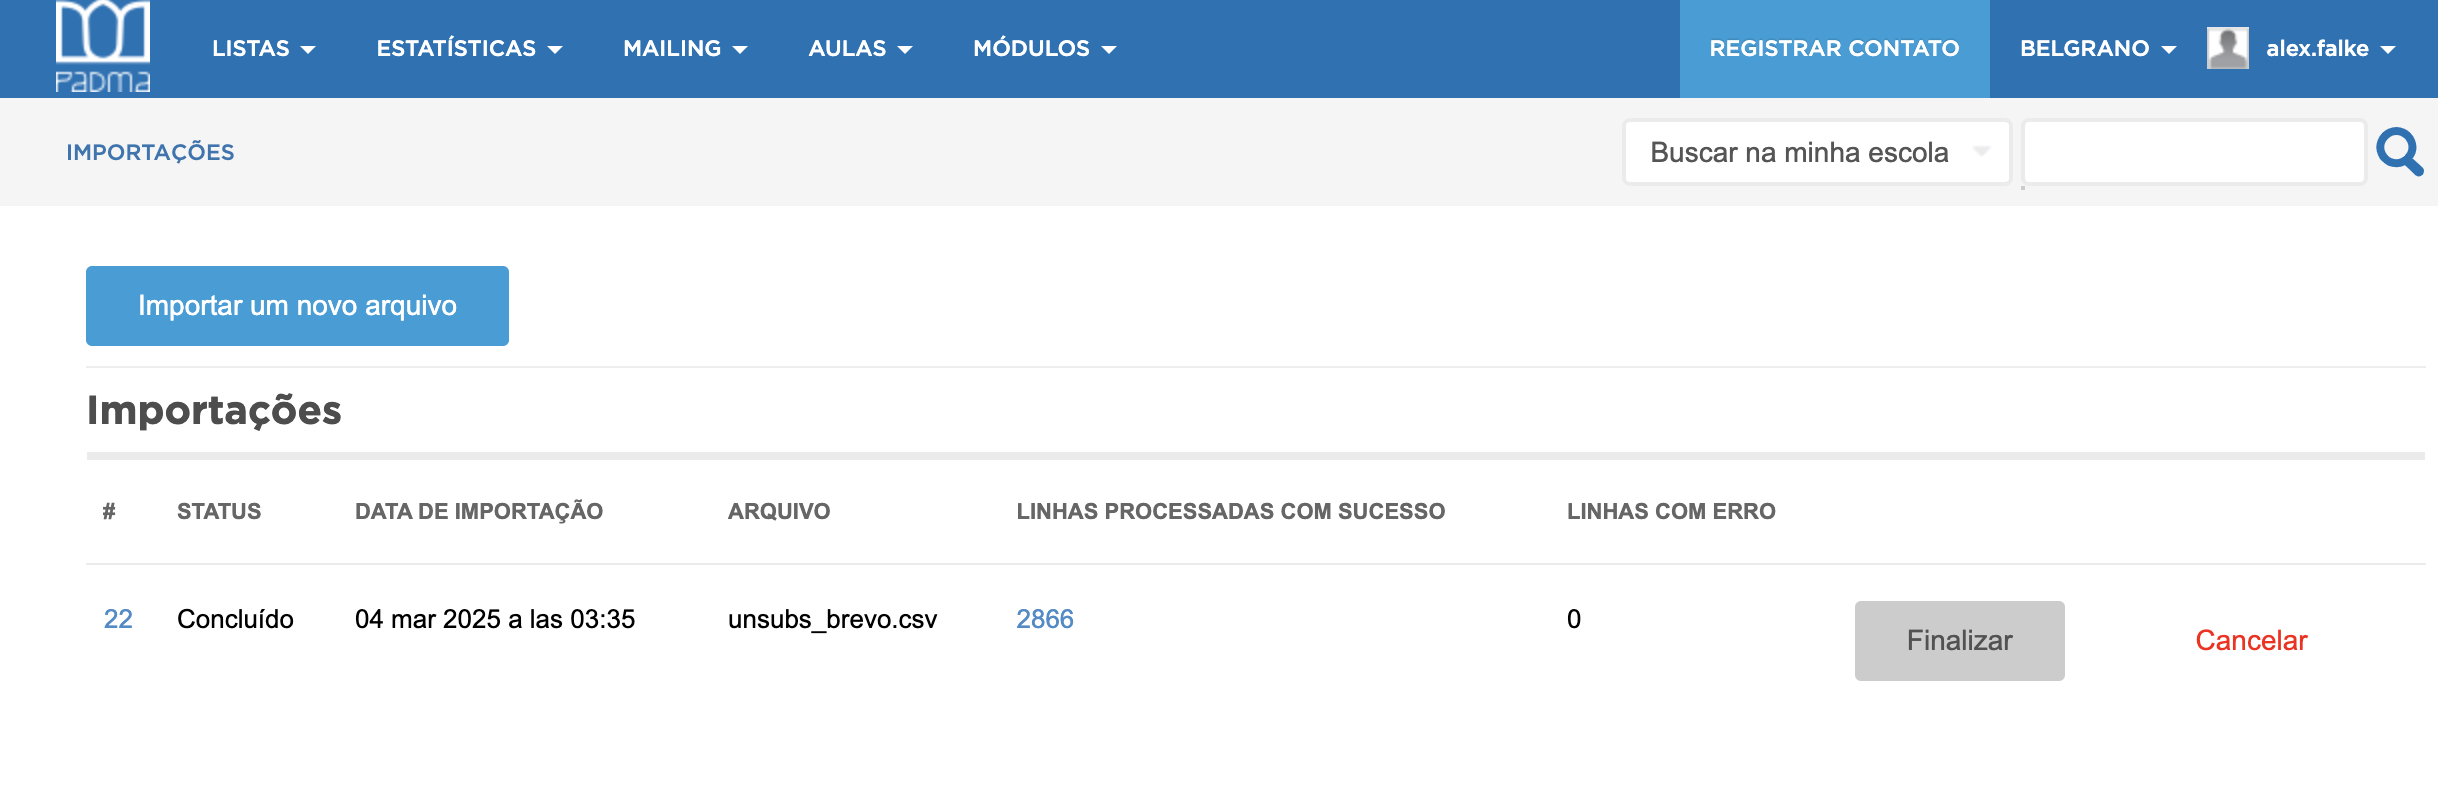
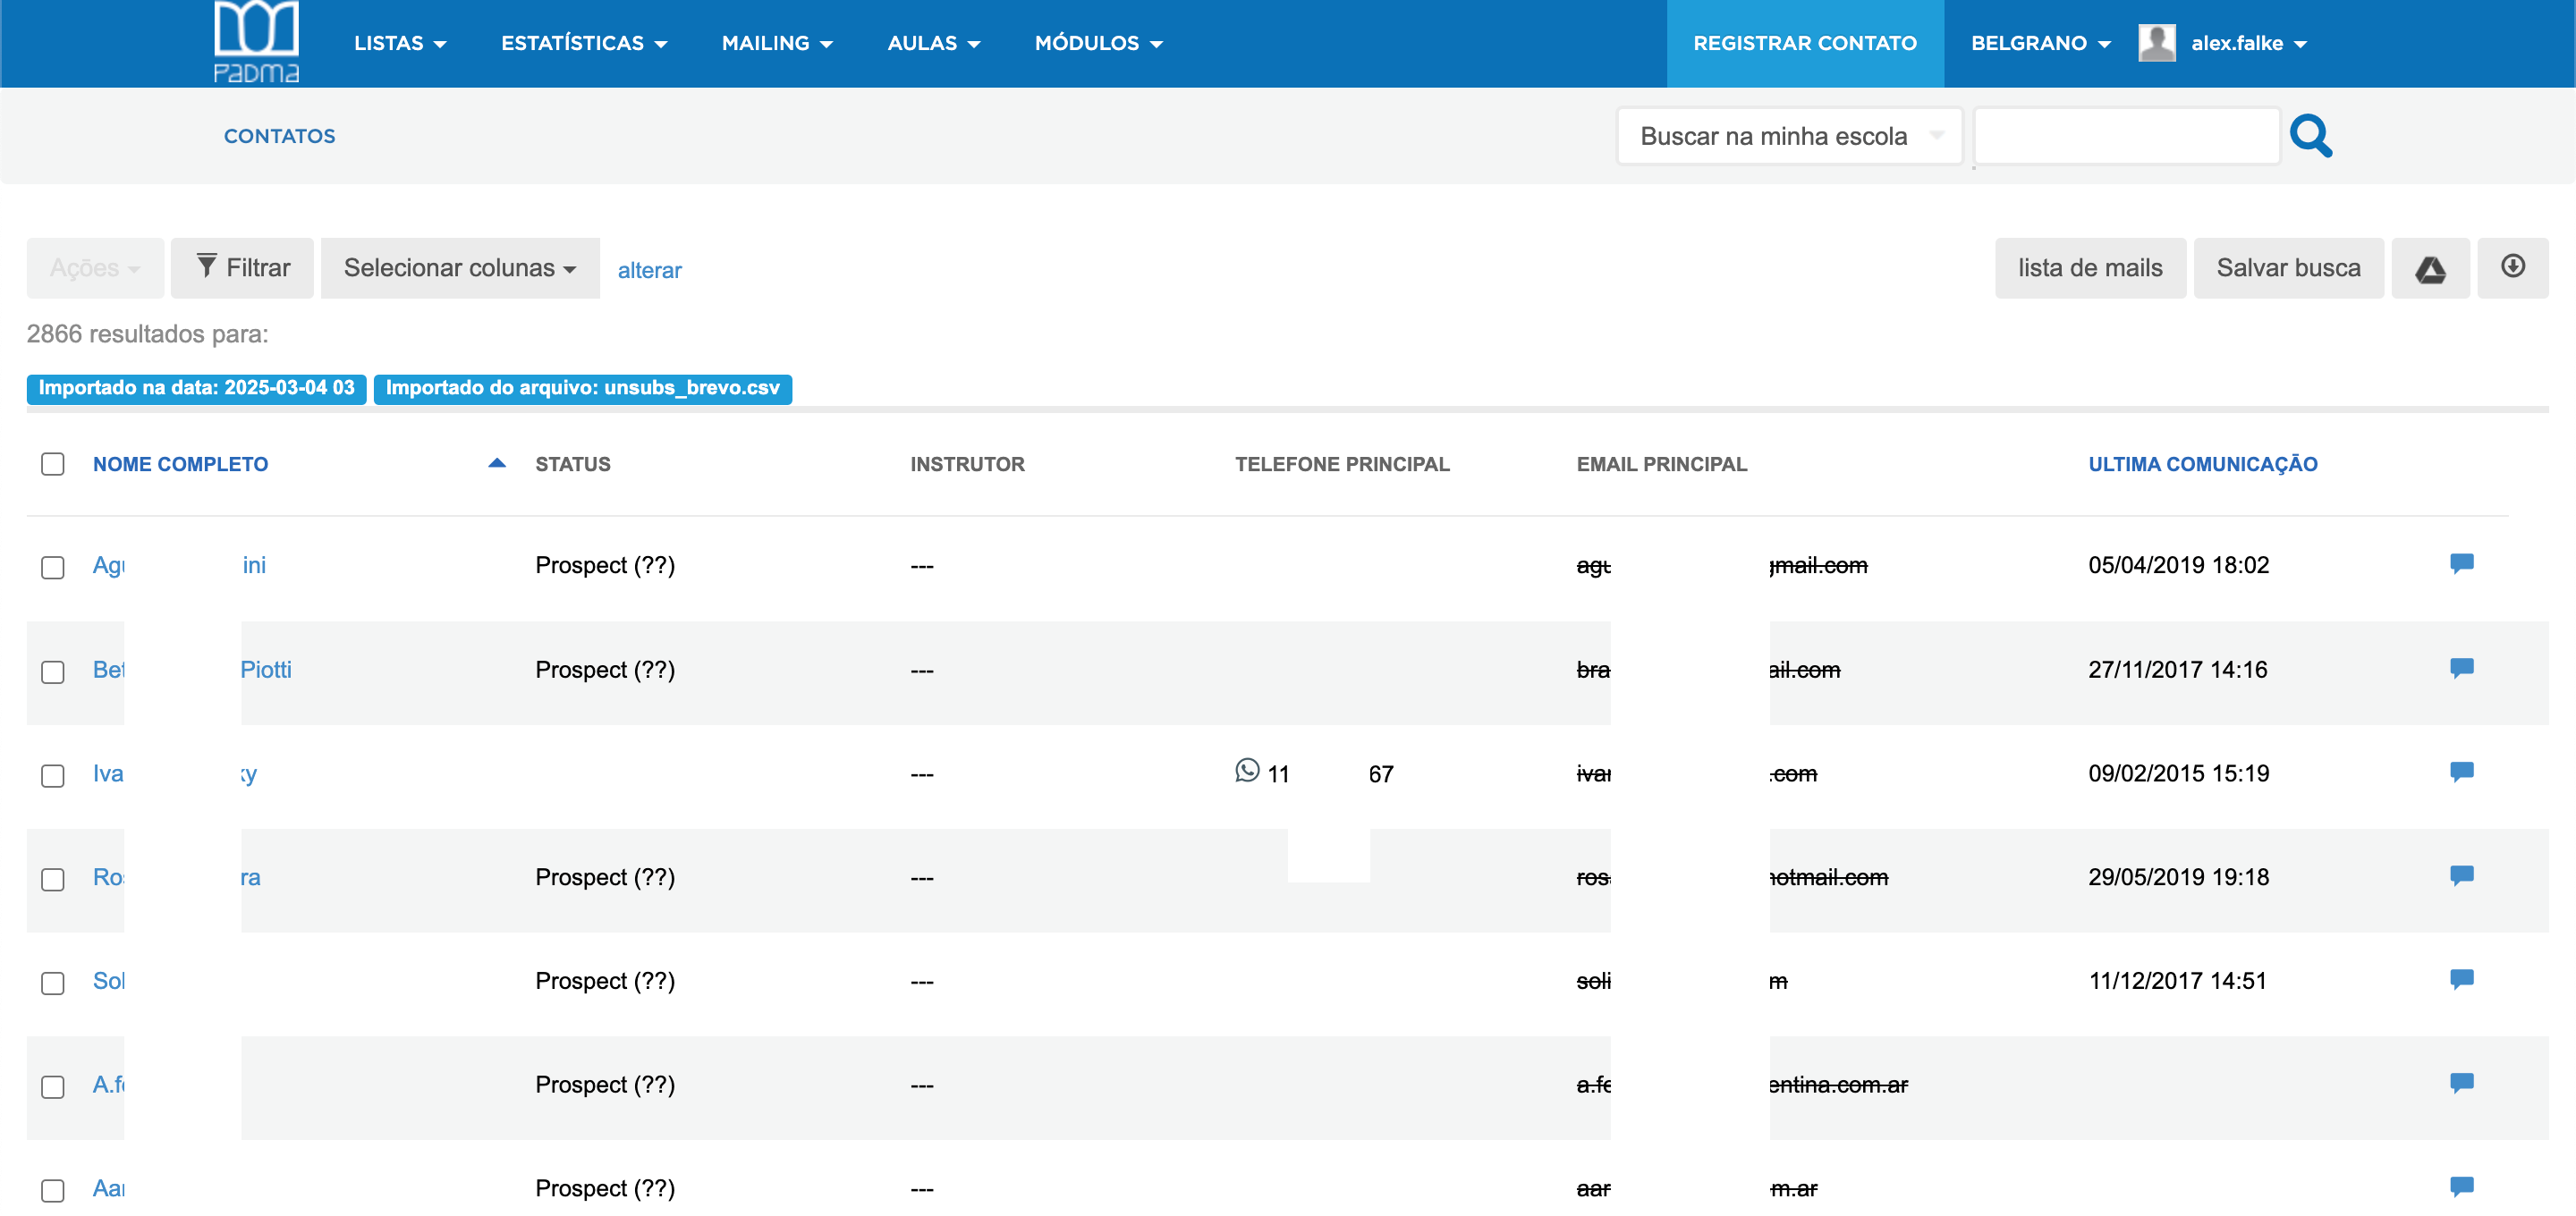
At the end, there will be a link to see the modified contacts. Click on the processed line number to see the contacts created/modified by the import and you can confirm in that list that the main email has been disabled (appears crossed out).
<a id="1ac3160bddf2803b94f4e25930d6b4ff"></a><a id="1ac3160b-ddf2-803b-94f4-e25930d6b4ff"></a>

<img src="/help-assets/fb30837eeab32acdfbf685e1695603a9fcc1a64792eb8144d79e07c18d214b4d.png" alt="Screenshot 2025-03-04 at 03.44.54.png">

<a id="1ac3160bddf280f7b182edb7d70befce"></a><a id="1ac3160b-ddf2-80f7-b182-edb7d70befce"></a>

<img src="/help-assets/7dcfef347ab11d2b61ab385b95c862744f73876a521e2f6bbae1eb68062c2740.png" alt="Screenshot 2025-03-04 at 03.45.52 (1).png">